Normally, S3 buckets are set to private, meaning you need to grant access to individual users in order for them to access their files. However, there may be situations where certain files in the S3 bucket need to be accessed by users without requiring any credentials or permissions.
Looking for a solution? AWS S3 offers pre-signed URLs, a highly beneficial feature to address your needs.
Here are some scenarios that illustrate the importance of using presigned URLs:
If you're creating a web conferencing software and saving video recordings in a private S3 bucket, you may need to grant access to a specific recording to an individual user. In that case, you can create a presigned URL for that single file and share the URL with the user.
In your product, users upload profile pictures on their profile page. To upload these pictures directly to the S3 bucket from the front end, you'll need to use presigned URLs.
Benefits of Presigned URLs:
Limited Time Access: You can configure the URLs' expiration time when creating them. So, it can be useful only for a limited period of time.
Safe Access of Buckets: As it is possible to expose only relevant files to the public, there is no need for you to change the entire bucket to be publicly accessible. Your S3 bucket will stay private always.
Secured URLs: Nobody can alter the URL parameters when uploading the files to the S3 bucket. This is because the URLs are created using cryptographic signatures and the verification will fail when someone tries to change it.
Now, Let's learn about programmatically creating pre-signed URLs using the AWS Boto3 SDK.
In your project folder, Install the Boto3 SDK by running the command.
pip install boto3
Accessing the Private Objects in the S3 bucket
Then you can create a Python file inside your folder, copy and execute the below code.
import boto3

session = boto3.Session(
    aws_access_key_id="<Provide your AWS access Key ID>",
    aws_secret_access_key="<Provide your AWS Secret Key>",
    region_name="us-east-1"
)

s3_client = session.client('s3')

url = s3_client.generate_presigned_url(
    ClientMethod="get_object",
    Params={
        'Bucket': 'demobucket',
        'Key': 'test-cover.png'
    },
    ExpiresIn=1800
    )

print(url)
This is what happens:
Create a Boto3 Client for s3 using your AWS Credentials.
Using the S3 Client, Generate a presigned URL for the
test-cover.pngobject in the bucket named "demobucket".Here the expiry is set as 1800 seconds. But you can alter it as you want.
On executing the code, you will get an URL like below:
https://demobucket.s3.amazonaws.com/test-cover.png?AWSAccessKeyId=AKIAY********&Signature=%2FfE94is0ONgAVW4LgafRLWxgvLg%3D&Expires=1690732722
You can share this URL with any of your users or web applications. With this URL, users can easily view the objects without needing any extra credentials or access.
Uploading an Object to a Private S3 bucket
In order to upload files from your application's frontend to private S3 buckets, you will need to generate a presigned post URL.
response  = s3_client.generate_presigned_post(
    Bucket='demobucket',
    Key='testimage.png',
    ExpiresIn=1800
)

print(response)
Use the above code to generate a post URL for uploading an object by providing the desired Bucket Name, Object Name and Expiration time.
If everything works well, you will get the JSON response as follows.
{
   "url":"https://demobucket.s3.amazonaws.com/",
   "fields":{
      "key":"testimage.png",
      "AWSAccessKeyId":"AKIAY*******",
      "policy":"eyJleHBpcmF0aW9uIjogIjIwMjMtMDctMzBUMTY6MDU6MThaIiwgImNvbmRpdGlvbnMiOiBbeyJidWNrZXQiOiAiZXN3YXJpYnVja2V0In0sIHsia2V5IjogInRlc3RpbWFnZS5wbmcifV19",
      "signature":"qbpmLnc4pBaVFSRlXzcsrQmYXRw="
   }
}
The response will contain the fields such as AWS Access Key ID, Policy and Signature.

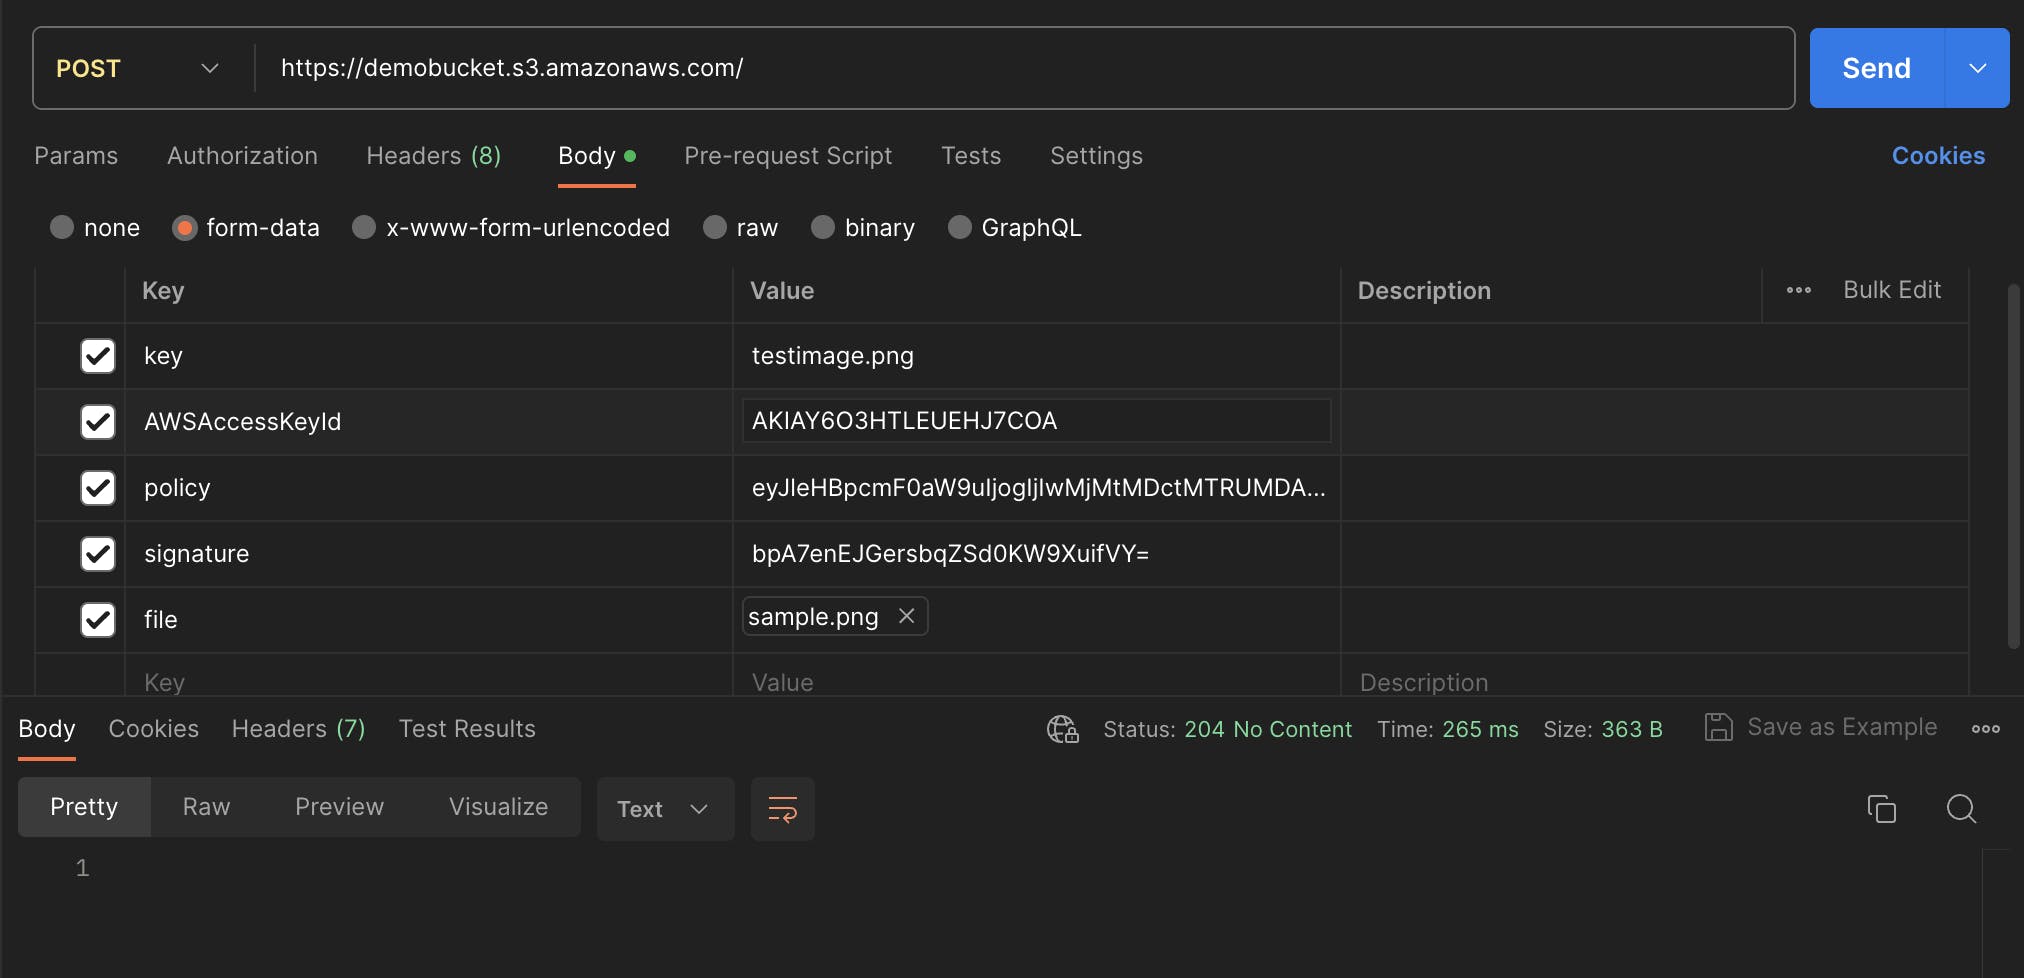
Here I have tried to upload a file using the pre-signed URL from Postman. You can even use it directly in your app UI where you have the file upload functionality.
To properly send your request to the URL, ensure that you set the fields and files as form data in the body of the request.
This will upload the file to the S3 bucket.
Conclusion
In this blog post, you explored how to interact with Amazon S3 using Boto3, the AWS SDK for Python.
We started by generating a pre-signed URL for an object in a private S3 bucket, allowing users or web applications to easily view the object without requiring any extra credentials or access.
Next, we delved into the process of uploading an object to a private S3 bucket from an application's frontend.
Happy Coding !

